Swift - 使用xib自定义表格中分组section的header和footer
在之前的文章中:Swift - 修改tableView分组(section)头部、尾部的字体颜色和大小。我介绍了如何通过纯代码的方式来自定义表格(tableView)里每个分组(section)的 header和 footer。但如果要实现的样式比较复杂,那么使用纯代码实现就会比较麻烦,这时我们还可以借助 xib 来实现。
下面演示如何使用 xib 来自定义 section 的 header 和 footer,对于自定义整个 tableView 的 header 和 footer 的原理也一样的。
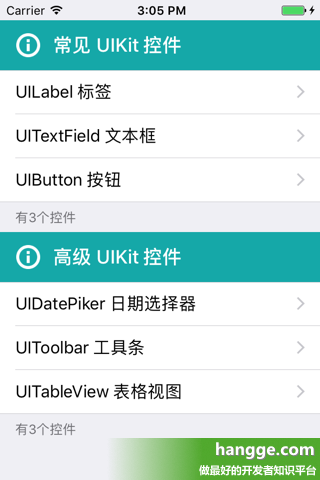
1,样例效果图
我们将分组头背景色改成绿色,文字改成白色。同时在文字前面添加了个图标。
2,创建自定义的分组头
(1)首先新建一个 XIB 文件(带有 View 的),名叫 MyTableViewSectionHeader

(2)将 xib 文件中 View 的 Size 修改为 Freedom,Status bar 修改为 None。并将其调整成合适的尺寸。

(3)在 View 中添加一个 UIImage 和一个 UILabel,分别用来显示图标和分组标题。并设置好它们的相关属性和约束。

(4)选择 Label,将其 Tag 设置为 1。后面使用时通过这个 tag 来取得标签并进行赋值。

由于这个自定义的分组头比较简单,所以我这里只需要创建一个 xib 文件就够了。不需要再在创建对应实现类。
关于 xib 如何关联对应的 UIView 类,可以参考我之前的这篇文章:Swift - XIB结合UIView制作自定义组件(xib加载绘制UIView)
关于 xib 如何关联对应的 UIView 类,可以参考我之前的这篇文章:Swift - XIB结合UIView制作自定义组件(xib加载绘制UIView)
3,使用自定义的分组头
1 2 3 4 5 6 7 8 9 10 11 12 13 14 15 16 17 18 19 20 21 22 23 24 25 26 27 28 29 30 31 32 33 34 35 36 37 38 39 40 41 42 43 44 45 46 47 48 49 50 51 52 53 54 55 56 57 58 59 60 61 62 63 64 65 66 67 68 69 70 71 72 73 74 75 76 77 78 79 80 81 82 83 84 85 86 87 88 89 90 91 92 93 94 95 96 97 98 | import UIKitclass ViewController: UIViewController , UITableViewDelegate, UITableViewDataSource{ var tableView:UITableView? var allnames:Dictionary<Int, [String]>? var adHeaders:[String]? override func loadView() { super.loadView() } override func viewDidLoad() { super.viewDidLoad() //初始化数据,这一次数据,我们放在属性列表文件里 self.allnames = [ 0:[String]([ "UILabel 标签", "UITextField 文本框", "UIButton 按钮"]), 1:[String]([ "UIDatePiker 日期选择器", "UIToolbar 工具条", "UITableView 表格视图"]) ]; print(self.allnames) self.adHeaders = [ "常见 UIKit 控件", "高级 UIKit 控件" ] //创建表视图 self.tableView = UITableView(frame:self.view.frame, style:.grouped) self.tableView!.delegate = self self.tableView!.dataSource = self self.tableView!.contentInset = UIEdgeInsetsMake(20, 0, 0, 0) //创建一个重用的单元格 self.tableView!.register(UITableViewCell.self, forCellReuseIdentifier: "SwiftCell") self.view.addSubview(self.tableView!) } //在本例中,有2个分区 func numberOfSections(in tableView: UITableView) -> Int { return 2; } //返回表格行数(也就是返回控件数) func tableView(_ tableView: UITableView, numberOfRowsInSection section: Int) -> Int { let data = self.allnames?[section] return data!.count } //返回分区头部视图 func tableView(_ tableView: UITableView, viewForHeaderInSection section: Int) -> UIView? { let headerView = Bundle.main.loadNibNamed("MyTableViewSectionHeader", owner: self, options: nil)?[0] as! UIView let titleLabel = headerView.viewWithTag(1) as! UILabel titleLabel.text = self.adHeaders?[section] return headerView } //返回分区头部高度 func tableView(_ tableView: UITableView, heightForHeaderInSection section: Int) -> CGFloat { return 50 } // UITableViewDataSource协议中的方法,该方法的返回值决定指定分区的尾部 func tableView(_ tableView:UITableView, titleForFooterInSection section:Int) -> String? { let data = self.allnames?[section] return "有\(data!.count)个控件" } //创建各单元显示内容(创建参数indexPath指定的单元) func tableView(_ tableView: UITableView, cellForRowAt indexPath: IndexPath) -> UITableViewCell { //为了提供表格显示性能,已创建完成的单元需重复使用 let identify:String = "SwiftCell" //同一形式的单元格重复使用,在声明时已注册 let cell = tableView.dequeueReusableCell( withIdentifier: identify, for: indexPath) cell.accessoryType = .disclosureIndicator let secno = indexPath.section var data = self.allnames?[secno] cell.textLabel?.text = data![indexPath.row] return cell } override func didReceiveMemoryWarning() { super.didReceiveMemoryWarning() }} |
 hangge_1392.zip